Reports & Audit Journals
he Report Screen Menu

When the user accesses any of the report routines, they will see the menu displayed below. This menu appears along the top of all report screens.
File
Under the File menu, the user can click the Run Report option to generate the report, or click the Cancel option to cancel the generation of the report.
The user can also click the Import Text option to import text from a file on their computer to one of the text entry fields on the report screen, or click the Page Setup option to configure the parameters for printing the report (i.e. paper size, orientation, margins, and printer properties).
Edit
Under the Edit menu, all options are disabled.
View
Under the View menu, the user can switch between the two pages that make up the reports screen (i.e. the main reports screen and the reports explanation screen) by using the Previous Page and Next Page options.
Help
Under the Help menu, the user can access the Reports Runtime Help system (help with Oracle Reports, not eQuinox), or the About Reports Runtime screen (gives version information, etc).
The "traffic light" button allows the user to generate the report, and the "red x" button allows the user to cancel the generation of the report.
The "black arrow" buttons allow the user to switch between the two pages that make up the reports screen (i.e. the main reports screen and the reports explanation screen).
The "blue question mark" button allows the user to access the Reports Runtime Help system.
Specifying System Parameters
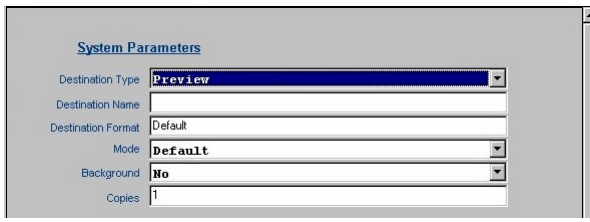
Each report screen has a System Parameters section, as seen below, in which the user must specify details for the generation of the report.
Destination Type
In the Destination Type drop down list, there are five options from which the user must make a selection. These options are explained below.
-
Preview - This option, which is selected by default, allows the user to display the report information on the screen the way in which in would appear in a printed version of the report.
-
Screen - This option allows the user to display the report information on the screen, but not necessarily in the same format in which it would appear in a printed version of the report.
-
File - This option allows the user to save the report as a file. When using this option, the user must specify a path and name for the file in the Destination Name field, and the format for the file in the Destination Format field. The file will be saved in the directory specified in the Destination Name field.
-
Printer - This option allows the user to send the report to the printer. When using this option, the user must specify the printer name (as it is named in the Printers directory of the users computer) in the Destination Name field. When the user selects the Printer option, the name of the user's default printer is displayed by default, but this may be changed by typing the name of a different printer.
-
Mail - This option allows the user to send the report to a specified recipient through Oracle Mail. When using this option, the user must specify the name of the recipient in the Destination Name field. When the report is generated, the Oracle Mail system will automatically be initialized.
Destination Name
The use of this field differs, depending on the selection made in the Destination Type field. If the user has selected the File option, they must specify the file name here; if the user has selected the Printer option, they must specify the printer name here; if the user has selected the Mail option, the must specify the mail recipient here.
Destination Format
This field is used in conjunction with the File option in the Destination Type field.
When saving the report to a file, the user must specify the desired format for the report. Valid options are .txt (text file), .rtf (rich text format), .html (hypertext markup language), or .pdf (used with Adobe Acrobat).
Mode
In the Mode drop down list, there are three options from which the user must make a selection. The options are to produce the report in the default mode, in bitmap mode, or in character mode. When producing the report in character mode, the user must specify a printer in the Destination Name field. This field default to the "Default" option.
Background
From the Background drop down list, the user must select either Yes or No. If the user selects Yes, the report will be run as a background operation and will not tie up the screen. If the user selects No, the report will tie up the screen, but will be generated faster than it would if run in the background. This field defaults to "No".
Copies
When sending the report to a printer, the user must specify the number of copies of the report that they wish to produce. This field defaults to "1".
Specifying User Parameters
MOST report screens have a User Parameters section, as seen below, in which the user must indicate content details for the report (i.e.. date ranges, Client/ Matter ranges, etc). Since User Parameters are different for most reports (i.e. all reports do not have the same options in this section), the screen shot below is an example only, not necessarily what will be seen on all report screens. For those reports that do not have a User Parameters section, the user may run the report based solely on the System Parameter selections.
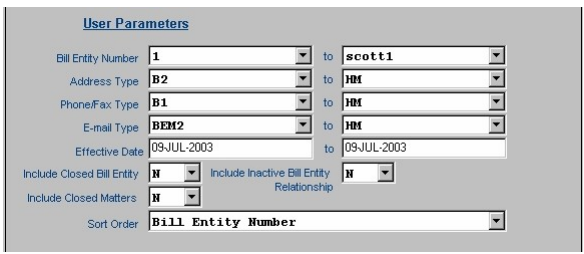
Most fields in this section of the screen have drop-down lists from which the user may make a selection. In other instances, such as Dates or Journal Number ranges, etc, the user must manually enter the information. User Parameters are explained in detail in the Help pages for each individual report (i.e. from details on the User Parameters for the Bill Entity Address Listing Report, go to the Reports & Audit Journals section of the Help system and then select the link for that report.)
Oracle Reports Viewer
When the report is sent to the screen (i.e. with the Preview and Screen options),

the report is displayed in the Oracle Reports Previewer. The Previewer menu is explained below.
File
Under the File menu, the user can click the Page Setup option to configure the parameters for printing the report (i.e. paper size, orientation, margins, and printer properties), the Print option to send the report to a printer, the Mail option to send the report to a recipient through Oracle Mail, the Distribute option to send the report to those specified on a Distribution List, or the Generate to File option to save the report as a file on their computer.
When saving the report as a file, the user must also select the file type (i.e.
text, rtf, html, etc).
Edit
The options under the Edit menu are disabled.
View
Under the View menu, the user can click the Zoom In and Zoom Out options to change the size of the report on the screen, the New Previewer option to start a new instance of the Previewer with the current report, or the Close Previewer option to close the current instance of the Previewer. The user can also use the First Page, Previous Page, Next Page, and Last Page options to navigate to different pages of the report.
Window
Under the Window menu, the names of the different reports or documents that are open in the current instance of the previewer are displayed. The user can switch between reports and/or documents by selecting the name here.
Help
Under the Help menu, the user can access the Reports Runtime Help system (help with Oracle Reports, not eQuinox), or the About Reports Runtime screen (gives version information, etc).
The buttons that run along the bottom of the menu allow the user to perform the same functions that the menu does. In order of appearance, the buttons are Print, Page Setup, Mail, New Previewer, Close Previewer, Zoom In, Zoom Out, First Page, Previous Page, Next Page, and Last Page.
The Page field displays the current page of the report; to switch pages, the user can enter the desired page number in this field and then hit the enter key. The "blue question mark" button allows the user to access the Reports Runtime Help system.
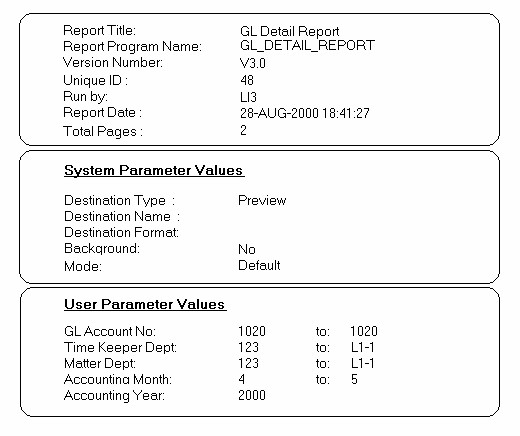
The Reports Title Page
Note: Audit Journals do not have a title page. When reports are generated, they are each given a title page. As seen below, the title page displays details for the current report, as well as the System Parameters and User Parameters that were selected before the report was generated.